

Swapped over my standard reversing lights for a pair of LED units, so thought I would give a little write up. There are only two lights that we can change out, they being the indicator and the reversing light. The others are LED and require a new rear light cluster if they go.
Equipment used:
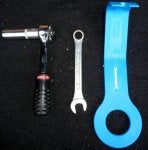
Trim clip remover
10mm long reach 1/4 drive socket and ratchet
or
10mm ring/open end spanner. The ring is better than the open end
![]()
Locate and remove the two clips holding the boot/trunk liner in place, both are in the "roof" of the boot/trunk and pull away the boot/trunk liner to gain access to the rear of the light cluster
![]()
You need to remove the three nuts to release the light cluster. Use the socket/spanner to break the torque on them then using you fingers wind off the nuts - they are that easy. This way you are less likely to drop the nut, not too much of a problem except it then becomes a bigger strip out to recover the dropped nut. More of a problem on the Right side of the vehicle due to the battery and associated wiring and fuse box.
Behind the boot/trunk liner RHS shown, (LHS similar). Note the third stud/nut is out toward the wing behind the wiring loom
![]()
Slide the light unit out and disconnet the main light cluster plug, you then have the light unit all to yourself.
Light cluster Housing
![]()
My OCD kicked in at this point and after a quick clean a coat of FinishKare 1000P sealant wax was applied and buffed up to nice shine.
Rear of light cluster
![]()
Close up of the two plugs of the two bulbs that can be replaced, the red/brown/grey coloured plug is the indicator, whereas the grey/black coloured one is the reversing light, the all black coloured plug is the main feed from the vehicle.
![]()
Its a case now of changing your bulb out, re-assembling the light cluster into the vehicle and before you trim up check all the lights with an able assistant. A tip here is to run the nuts on with your fingers, then do them up fully with the spanner or socket. - less likely to drop them.
An able assistant (File Photo)
![]()
Once you have checked the lights and all is ok, the trim goes back, the two clips are pushed home, and the edge of the boot/trunk liner is run around under the boot/trunk rubber seal.
Equipment used:
Trim clip remover
10mm long reach 1/4 drive socket and ratchet
or
10mm ring/open end spanner. The ring is better than the open end
Locate and remove the two clips holding the boot/trunk liner in place, both are in the "roof" of the boot/trunk and pull away the boot/trunk liner to gain access to the rear of the light cluster

You need to remove the three nuts to release the light cluster. Use the socket/spanner to break the torque on them then using you fingers wind off the nuts - they are that easy. This way you are less likely to drop the nut, not too much of a problem except it then becomes a bigger strip out to recover the dropped nut. More of a problem on the Right side of the vehicle due to the battery and associated wiring and fuse box.
Behind the boot/trunk liner RHS shown, (LHS similar). Note the third stud/nut is out toward the wing behind the wiring loom

Slide the light unit out and disconnet the main light cluster plug, you then have the light unit all to yourself.
Light cluster Housing

My OCD kicked in at this point and after a quick clean a coat of FinishKare 1000P sealant wax was applied and buffed up to nice shine.
Rear of light cluster

Close up of the two plugs of the two bulbs that can be replaced, the red/brown/grey coloured plug is the indicator, whereas the grey/black coloured one is the reversing light, the all black coloured plug is the main feed from the vehicle.

Its a case now of changing your bulb out, re-assembling the light cluster into the vehicle and before you trim up check all the lights with an able assistant. A tip here is to run the nuts on with your fingers, then do them up fully with the spanner or socket. - less likely to drop them.
An able assistant (File Photo)

Once you have checked the lights and all is ok, the trim goes back, the two clips are pushed home, and the edge of the boot/trunk liner is run around under the boot/trunk rubber seal.


